Idag satt jag och kollade på den här hemsidans temafiler för när man öppnar ett inlägg så det är i fokus (single.php).

På den här hemsidan använder jag ett tema, som jag inte längre tror är så lätt att få tag i, som heter ”Flat”, detta då den här sidan skapades för ganska längesen och temat valdes när sidan skapades.

Tips för att skapa Child Theme för din WordPress sida

Hursomhaver, så har jag gjort ett Child Theme för sidan, med hjälp av det fantastiskt smidiga WP pluginnet WordPress Child Theme Configurator som man bör som best praxis, för att undvika ev. förlust av ändringar man gör vid temauppdatering i framtiden.

Ändra temafiler i WordPress

Som kanske många av er vet så är WordPress temafiler kodade med kodspråket: PHP, och det blir därför detta kodspråk vi kommer använda för att fixa in kategorier till mina inläggs temafiler.

Steg 1 – Hitta rätt temafil att börja gräva i för vart man behöver ändra

När man vill ändra filer från huvudtemat i sitt child theme så får man gå till Utseende > Filredigeraren i WordPress adminpanelen och bläddra fram uppe i högra hörnet originaltemat och dess filer.

Steg 2 – Inspektion av koden för att hitta vart man behöver ändra

När man väl har huvudtemats filer uppe så kan man inspektera hur koden ser ut för t ex. single.php som i vårt fall var relevant då jag ville ändra hur hemsidan presenteras när någon besöker ett specifikt inlägg på sidan.

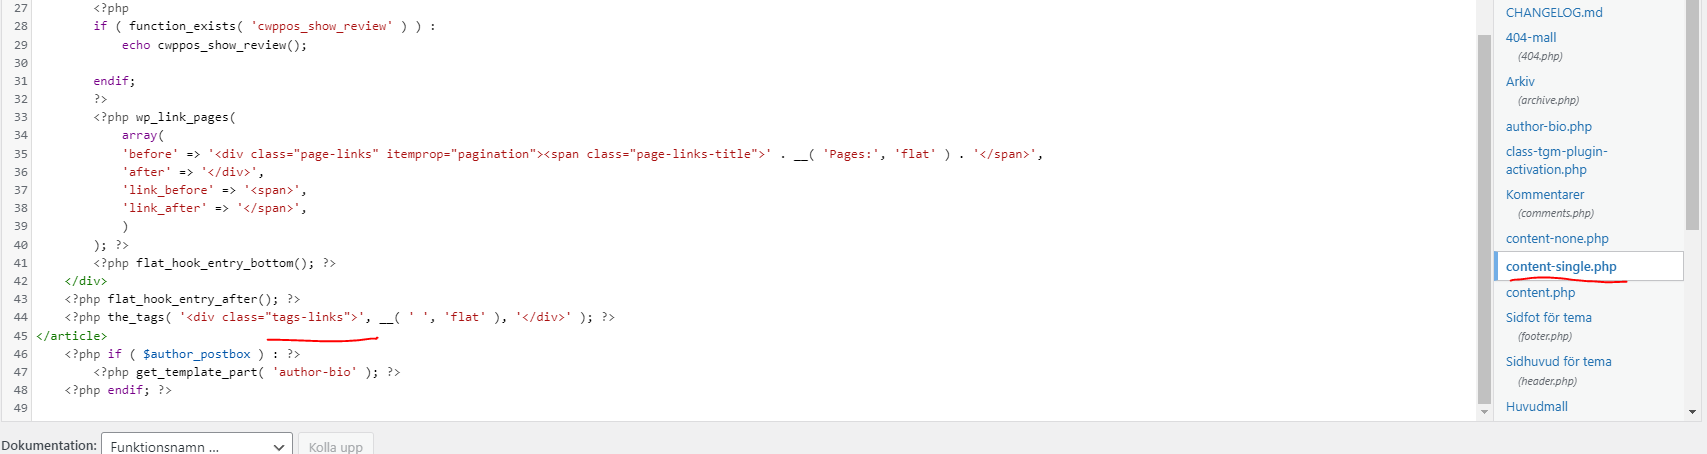
Väl där inne möttes jag av följande kod:

single.php screenshot för mitt flat wordpress tema

Som ni kan se ovan så visar WordPress temaredigerare ”Enskilt inlägg” för min single.php.

Likaså kan ni se i själva koden get_template_part() WordPress funktionen som anropas som jag strukit under.

Denna funktion laddar in en annan template fil inuti den jag befinner mig i- och där koden är skriven (single.php i det här fallet).

I detta fall verkade temafilen content-single.php laddas in.

Steg 3 – Hitta koden vi behöver redigera

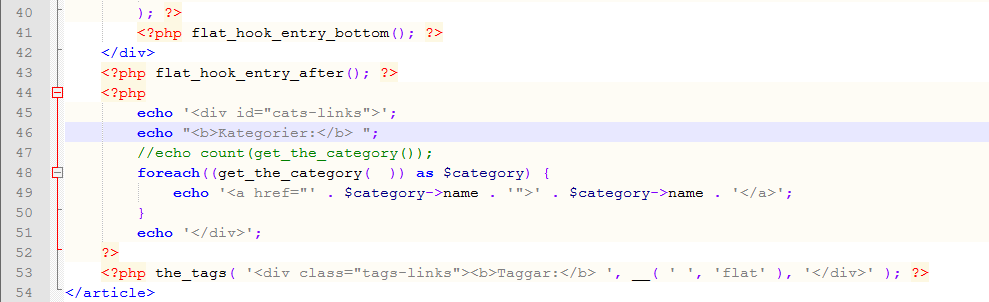
Så då letade jag upp denna för att inspektera hur den såg ut, då jag kunde se i single.php inte hade det jag ville komma åt att ändra – vilket i det här fallet var att lägga till kategorier intill mina taggar i slutet av inlägget.

content-single.php screenshot

Som vi kan se i ovan bild, så hittade jag det jag letade efter i content-single.php, nämligen DIV-elementet med class ”tags-links” som höll mina taggar i slutet av inlägg när besökt.

Remote FTP som alternativ för att enkelt arbeta med WordPress temafiler

Alternativ till ovan WordPress redigererare kan man ta fram hemsidans FTP via antingen FileZilla FTP client, eller någon form av Remote FTP som ex. den jag använder via min Notepad++.

Med Remote FTP behöver du bara:

  1. ”öppna” (ladda ned) filen efter du kopplat upp dig mot sidans FTP
  2. Göra dina ändringar
  3. Sen trycka CTRL + S för att spara (beroende på texteditor)

Därefter kommer ändringar automatiskt och direkt skickas upp till din hemsida så du kan se resultaten av din kod Live (på gott och ont).

Det kan dock vara bra att vara lite vaksam när man arbetar med Remote FTP, då session ibland kan disconnectas vid inaktivitet en längre tid.

Om det händer kan det hända att man behöver spara ändringarna i filen flera gånger, för att göra det kanske man behöver lägga till ”asd” eller annat godtyckligt så ens texteditor känner igen en ändring i filen för att tillåta omsparande, och kanske göra det 1-2 gånger. Så behöver jag iaf. göra i Notepad++ oftast vid disconnect.

Likaså kan det vara bra om man är flera som arbetar i samma filer att man håller lite koll på vem som sparar upp ändringar när och laddar ned filer de ska jobba i när, för det är lätt hänt att någon kan ha laddat ned samma fil som du vill jobba i tidigare, och gör ändringar i den för att sen synka upp till sidan, men när du laddar upp dina ändringar för den då äldre filen så skrivs deras ändringar över.

Detta extra viktigt att hålla koll på om man inte har Versionshantering via t ex. Git och GitHub eller liknande.

Kan varmt rekommendera Remote FTP för att göra temafilsändringar hellre än att hålla på att Ladda ned fil från t ex. FileZilla FTP klient, redigera, sen ladda upp manuellt.

Steg 4 – Redigera vår överskrivna temafil till så som vi vill ha det

Härifrån sen var nästa steg att skriva över denna content-single.php filen i mitt child theme.

Detta då jag ville göra egna ändringar till den för att komplettera hur den såg ut i nuläget för att forma hur inlägget ser ut till såsom jag ville ha det.

Steg 4.1 – Skapa override filen i vårt child theme

jag skapade content-single.php i samma mapp som mitt child theme (då temafilen inte låg inuti någon undermapp i huvudtemat).

Steg 4.2 – Kopiera över koden från huvudtemats temafil till override filen i child temat

Därefter kopierade jag koden från huvudtemats content-single.php fil till min nyskapade child theme content-single.php fil.

Steg 4.3 – Research för att ta reda på vad som behövs för att göra ändringar vi vill göra

Jag googlade lite för att hitta en WordPress funktion som det verkade som att andra tidigare använt för att göra det jag ville, get_the_category().

Steg 4.4 – Börja göra ändringarna och testa utfallet

Sen lade jag in en ny DIV-behållare för mina inläggskategorier och skapade inuti en foreach-loop för varje kategori så jag kunde formatera det i form av länkar som var klickbara.

kodändringar content-single child theme fil screenshot

Notera att detta basically bara är ”crude” test för att få det såsom jag vill. Exempelvis är ”Kategorier” inte kodat för flerspråkighet om man vill ha det, osv.

Jag hade också kunnat skippa flera echo statements och bara skrivit HTML-koden såsom resten av temafilen för övrigt var kodad. Men nu fick det bli såhär för just denna gång :)

PHP koden:

count(get_the_category())

Anropade jag bara för att testa om

  1. Det gick att räkna antalet kategoriobjekt med count() i PHP, bara som en kontroll om WPTerm Array funkade som vanliga PHP-arrayer, för det är inte nödvändigtvis givet
  2. Som förebyggande inför en viss typ av formatering jag först funderade på för sidan där jag tänkte ha kategorierna flödande utskrivna med komma-separerat emellan (förutom sista) vilket isf. hade kunnat fixas med en if-sats som kollade när loopen ej befann sig på sista och då skrev ut kommatecken i slutet efter länken för kategorin med hjälp av en counter-variabel i och med att vi använde oss av en foreach loop i just det här specifika fallet
Testa utfallet av anrop till ”nya” funktioner som man inte ännu är så bekant med genom printouts

Om man vill utforska mer i detalj returen från get_the_category() så hade man kunnat använda PHP’s var_dump() eller print_r() funktioner för att outputta returen på ett strukturerat och hyfsat lättläsligt vis på sidan för inspektion.

Tips för test på Live-sidor vid behov – fast som ej syns för besökare

Om man gör detta på en Live-sida kanske man inte vill att besökare ska kunna se att man håller på och testar, och då kan man istället ”wrappa” outputten i en style="display:none;" SPAN-tagg eller <pre>-block eller liknande.

Exempel:

<span style="display:none;">
   <?php echo print_r(get_the_category()); ?>
</span>
Hitta snabbt printout i koden med Google Inspector

Om man snabbt vill hitta det man outputtat i t ex. Google Code Inspector så hade man kunnat tilldela output elementet ett ID, en klass eller annat som är unikt på sidan så man via CTRL + F kommer direkt dit.

Steg 4.5 – Komplettera med CSS-Styling för utseende

Sen nästa steg att komplettera med lite CSS kod som ser ut som följer för att få det såsom jag ville ha det:

/*
* 24sept24
* */
.single-post div#cats-links {
   border-top: 1px solid #ccc;
   padding-top: 12px;
   margin-top: 40px;
   font-size: 14px;
}

.single-post div#cats-links a {
   color: #000;
   background-color: #eee;
   padding: 4px 10px;
   margin-right: 6px;
   margin-bottom: 6px;
   display: inline-block;
   padding-bottom: 1px;
   border: 1px solid #ccc;
}

.single-post .tags-links {
   font-size: 14px;
   margin-top: 10px !important;
}

.single-post .tags-links a {
   padding-bottom: 2px !important;
   border: 1px solid #ccc;
   color: #000;
}

.single-post #cats-links a:hover {
   background-color: #333;
   color: #fff;
}

Som ni kan se i ovan CSS-kod så har jag använt pixlar för måttenheter i just detta exempel av pedagogiska skäl då jag tycker det är lättast att förstå ”hur stort” det är, jämfört med relativa måttenheter som är baserade på annat mått procentuellt.

Inline-block som jag tilldelat till mina A-länktaggar är för att kunna applicera bl. a. margin-bottom då enbart inline-element inte tar det.

Färgkombinationerna var trial-and-error för att komma fram till, blev helt i extas när jag hittade kombon som är just nu som jag tyckte funkade alldeles utmärkt, jag kan tycka färgkombinationer är svårt och kräver ofta mycket experimenterande från min sida. Sen är ju smaken som baken också såklart.

Tips att använda ”failsafe” CSS-selektor för att begränsa CSS-kods applikationsområde

Ni kanske också märker jag lagt in en ”failsafe”-klass framför samtliga av mina regler jag lagt till mitt child themes ”Extra CSS”.

I just det här fallet för ”single-post”, vilket är en BODY-tagg klass som alltid finns när någon besöker ett inlägg på sidan, vilket garanterar att koden jag utformat enbart appliceras på just dessa sidor.

Kommentera datum/tid för ändring för kronologisk minneshjälp vid kodningsarbete

Notera också min kommentar med dagens datum i mitt speciella datumformat för CSS-tillskotten jag lade till, detta är mest för min egen skull för att ha ett hum om när vad tillkom i min CSS fil.

Jag upplever att det ger en form av kronologisk struktur som i kombination tillsammans med mitt eget minne skapar en tidslinje som kan hjälpa mig komma ihåg varför jag gjorde saker, när jag gjorde dem. Vilket kan vara ett vanligt förekommande problem att inte komma ihåg inom programmering osv. Därav kommentarer och deras funktion.

Ibland kompletterar jag även kommentaren om jag känner att det kan behövas, typ vid specialfix osv. Men i just det här fallet tyckte jag CSS-selektorer var ganska självförklarande och ansåg då det inte behövdes :)

För övrigt gillade jag designen med knapp-liknande klickbara både taggar och kategorier.

Visdom från UX guru Jakob Nielsens rekommendationer för mobilanvändare med touchscreen

Jag har alltid i bakhuvudet Jakob Nielsens UX best praxis rekommendation för mobilanvändare med att fingerblomman mätts upp till ca. 16x16px för klickytor på touchscreens, men i det här fallet gick jag faktiskt lite utanför denna rekommendationer och körde på mitt eget för att få något jag tyckte såg trevligt ut oavsett hur det var i förhållande till UX best praxis för mobil smartphone användare.

Kanske får justera för det i framtiden, men just nu får det vara som det är.

Såklart bör man alltid utveckla för att inkludera alla användare, eller åtminstone användare man riktar sig till och för att öppna upp för målgrupper, men ibland kan man göra temporära medvetna kompromisser i mån av brist av tid och prioritet i stunden.

I slutändan brukar man dock vid ett eller annat tillfälle komma tillbaka och fixa :)

Jag behövde nyss en Vanilla JavaScript funktion som kontrollerar om ett regex existerar i en array ELLER en sträng.

Efter att ha sökt runt på Google och kollat diverse StackOverflow svar hittade jag inget som tyckte passade mina behov, så det blev att bygga/koda det jag behövde själv.

En kombination av en tidigare kontroll jag använt för att kontrollera om en variabel är array eller inte, kombinerat tillsammans med regex.test funktion i Vanilla JavaScript och en for-loop, se nedan:

/**
 * Super useful function to loop through an array to check vs RegEx if value of array slot match to regex (if array contains a string), if it is, return true, if not false, can also check string match, two-in-one combo
 * @param arrOrStr  - array or str with value(s) to loop through for regex match
 * @param regex     - regex to match array slot values against
 * 
 * @return          - true or false depending if match or not
*/
function regExCheckArrayOrStrMatch(arrOrStr, regex) {

  if(Array.isArray(arrOrStr)) {
    //console.log("in array match value");
    for(var i = 0; i < arrOrStr.length; i++) {
      if(regex.test(arrOrStr[i])) {
        return true;
      }
    }
    return false;
  }else {
    //console.log("in string match value");
    return regex.test(arrOrStr);
  }
}

Jag gillar hur simpel funktionen blev, och från vårt testande verkade den funka hur bra som helst.

Jag publicerade koden på min GitHub: Trekka12 , då jag tänker där säkert kan finnas ett värde för fler att använda denna typ av funktionalitet för sina webbprojekt.

Notera att denna går alldeles utmärkt att använda likaså för ens projekt som Custom Functions i Google Sheets – då även dessa använder sig av JavaScript.

Vissa kanske har en preferens för foreach av olika anledningar istället för vanlig for-loop, och det hade säkert gått bra att skriva om den till det likaså.

Step 1: Suggested File & Folder Structure

MainFolder
   -file:   index.php
   -file:   index.html (base-template file)
   -folder: incl/ (for includes)
      -file:   incl/header.php
      -file:   incl/footer.php
      -file:   incl/config.php (PHP settings)
      -file:   incl/functions.php (PHP functionality for all pages)
   -folder: css/
      -file:   css/mainstyles.css
   -folder: img/


Step 2: Creating the base-template file (index.html)

This is where we build our website as a normal .html file with header, body and footer sections (the whole layout in a single file)!

Later on this will in turn be used as our base template that we will disect into 3 separate pieces:

  • header.php for header code
  • index.php for body and page-specific code
  • footer.php for endpage and footer code

Our base-template file will be very basic and simple and can be seen below:

<!DOCTYPE html>
<html>
<head>
   <meta charset="utf-8" />
   <title>This will be our first Dynamic website using PHP dynamic templating techniques :)</title>

   <!-- Make browser understand this is responsive site and not in need of 'pinch-zoom-ins' - Commented for now- remove if u want to use this--> 
   <!-- <meta name="viewport" content="width=device-width, initial-scale=1.0" /> -->

   <!-- Below is our main stylesheet for the page -->
   <link href="css/mainstyles.css" rel="stylesheet" type="text/css" media="all" />

   <!-- Below adds a 'shortcut-icon' a.k.a. 'bookmark/favorite icon'-->
   <link rel="shortcut icon" href="img/favicon.ico">

   <!-- Below allows for addition of this particular page's description for SEO -->
   <meta name="description" content="" />

   <!-- Below Meta-tags tells SE-Indexation spiders to index page and follow pagelinks of site -->
   <meta name="robots" content="index, follow" />
</head>
<body>
<div id="mainContainer"> <!-- Wrapper for page -->
   <header>
      <img src="img/logo.jpg" width="200" height="60" alt="" />
      <h1>Our homepage</h1>
      <p>- Slogan for this website</p>
   </header>
   <nav>
      <ul>
         <li><a href="#" target="_top">Home</a></li>
         <li><a href="#" target="_top">Portfolio</a></li>
         <li><a href="#" target="_top">About us</a></li>
         <li><a href="#" target="_top">Contact</a></li>
      </ul>
   </nav>
   <article>
      <h1>Content area for site is here...</h1>
      <p>And this is where all the content for the individual pages will end up.</p>
   </article>
   <footer>
      <p>&copy; Copyright <?php echo date('Y'); ?>. All rights reserved.</p>
      <hr />
      <a href="#" target="_top">Sitemap</a>
      <a href="#" target="_top">FAQ</a>
      <p>Phone: 070X-XX-XX-XX &bull; Email: test-[at]-testsite.org &bull; Address: Fictionstreet 32B, CA, USA</p>
   </footer>
</div> <!-- End of Wrapper for the page -->
</body>
</html>

Step 3: Process breakdown of how this is going to work

Okay, so the idea is to divide this website that we just created into different pieces (header, content and footer).
We do this by analyzing which parts will be recurring throughout every single subpage of the website.

For example: We can be pretty sure that all the code belonging to the ”header” section (including the main menu) will be available on every single subpage- as will the footer code!

This means that we can take all this code and place it in separate files.
In our case we call these files header.php & footer.php and have them placed in a folder named: incl, which is short for ”includes”.

Why do we do this then? Well the idea is to later include these separated external files, which together contains all the code for the entire page layout!

In this way we ”re-create” the website section by section by including these different parts into the ”main-subpage-file” – such as index.php for the mainpage, and contact.php for the contact page for example, etc.

Step 4: Start disecting & dividing the different sections of the website

###- header.php - can be seen below
###################################
<!DOCTYPE html>
<html>
<head>
   <meta charset="utf-8" />
   <title>This will be our first Dynamic website using PHP dynamic templating techniques :)</title>

   <!-- Make browser understand this is a responsive site and not in need of 'pinch-zoom-ins' - Commented for now- remove if you want to use this --> 
   <!-- <meta name="viewport" content="width=device-width, initial-scale=1.0" /> -->

   <!-- Below is our main stylesheet for the page -->
   <link href="css/mainstyles.css" rel="stylesheet" type="text/css" media="all" />

   <!-- Below adds a 'shortcut-icon' a.k.a. 'bookmark/favorite icon' -->
   <link rel="shortcut icon" href="img/favicon.ico">

   <!-- Below allows for addition of this particular page's description for SEO -->
   <meta name="description" content="" />

   <!-- Below Meta-tags tells SE-Indexation spiders to index page and follow pagelinks of site -->
   <meta name="robots" content="index, follow" />
</head>
<body>
<div id="mainContainer"> <!-- Wrapper for page -->
   <header>
      <img src="img/logo.jpg" width="200" height="60" alt="" />
      <h1>Our homepage</h1>
      <p>- Slogan for this website</p>
   </header>
   <nav>
      <ul>
         <li><a href="#" target="_top">Home</a></li>
         <li><a href="#" target="_top">Portfolio</a></li>
         <li><a href="#" target="_top">About us</a></li>
         <li><a href="#" target="_top">Contact</a></li>
      </ul>
   </nav>
   <article>
-----------------------------------
###- footer.php - can be seen below
###################################
   </article>
   <footer>
      <p>&copy; Copyright <?php echo date('Y'); ?>. All rights reserved.</p>
      <hr />
      <a href="#" target="_top">Sitemap</a>
      <a href="#" target="_top">FAQ</a>
      <p>Phone: 070X-XX-XX-XX &bull; Email: test@testsite.org &bull; Address: Fictionstreet 32B, CA, USA</p>
   </footer>
</div> <!-- End of Wrapper for the page -->
</body>
</html>
###################################

Now as you can probably can see, we included the ”<article>” in the header.php file, while we included the ”</article>” in the footer.php file, but totally ”ignored” the content of <article> in both files.

We did this because we plan ahead!

Every subpage of the website will probably have the need for a ”general content-container” to place that particular page’s contents in – so we make the <article> container itself become recurring, while the content of the container- is not.

So perhaps you’re asking yourselves now whats next? Well, we need to put the website back together again after having disected it- thats our next move- including the header.php & footer.php in the index.php for the websites main-subpage.

###- index.php - can be seen below:
###################################
<?php include('incl/header.php'); ?>

<!-- Here comes the HTML content specific to this Mainpage (will be placed inside of <article> in header.php since that is the last piece of code included with the header.php file) -->

<?php include('incl/footer.php'); ?>
###################################

Now the website will have been recreated in index.php, since it first includes header.php (and all the code this file holds), then the HTML-content for that specific subpage, and last but not least- the footer.php file and the code that file holds.

Step 5: config.php & functions.php Explained

Okay, so you might be wondering now that we seem to be done already why we made 2 extra files in the incl/ folder?

Well this is simply for the purpose of ”looking & planning ahead”.

In the future the idea is that the config.php file will hold configuration code for the entire page (settings if you will). While the functions.php file will hold useful PHP functionality – which later can be included into the header.php to be available for all of the respective subpages.

And another thing worth pointing out- the footer.php will be able to hold all of the JavaScript code file inclusions that you want to load at the end of all subpages!

Step 6: Adding dynamic SEO content (title & meta-desc) for each individual page

There are tons of more fun and powerful/useful stuff you can do with a Dynamic website template like this in PHP!

For example if we want unique <title> texts for each individual subpage, we only replace our current HTML content in the header.php file between <title> & </title> with something like:
<?php echo $subPageTitleVariable; ?>

Then all thats left to do is to within index.php Above where we include header.php -> place:

$subPageTitleVariable = "our specific subpage &lt;title&gt; text";

And this would be available for the header.php file to make use of- seeing as how we placed it Above where header.php was included within the file and PHP works vertically through the code from top->bottom. Where top-placed code will be available for bottom-placed code in the code file/page. See below example:

###- index.php - can be seen below:
###################################
<?php $subPageTitleVariable = "This is our dynamic index page specific title text"; ?>
<?php include('incl/header.php'); ?>

<!-- Here comes the HTML content specific to this Mainpage (will be placed inside of <article> in header.php since that is the last piece of code included with the header.php file) -->

<?php include('incl/footer.php'); ?> 
###################################

This method and technique can also be utilized- and comes in very handy for On-Page SEO- where you need to specify specific meta-descriptions for each individual subpage!

As one last thing worth to mention is that I recommend you to start the config.php file by placing:

<?php error_reporting(-1); ?>

To report ALL Possible (PHP) errors on the page for debugging (recommended to be turned off when publish page – 0 as value instead of -1).

Also- include config.php Above header.php inside the index.php file, so that the Error Reporting is active for the Entire page.

Good Luck with all your Coding out there now ;)

Hope you learned something new and/or get some new ideas for your next projects ;) Was a pleasure helping out and hopefully inspiring to new creativity :) Enjoy!